
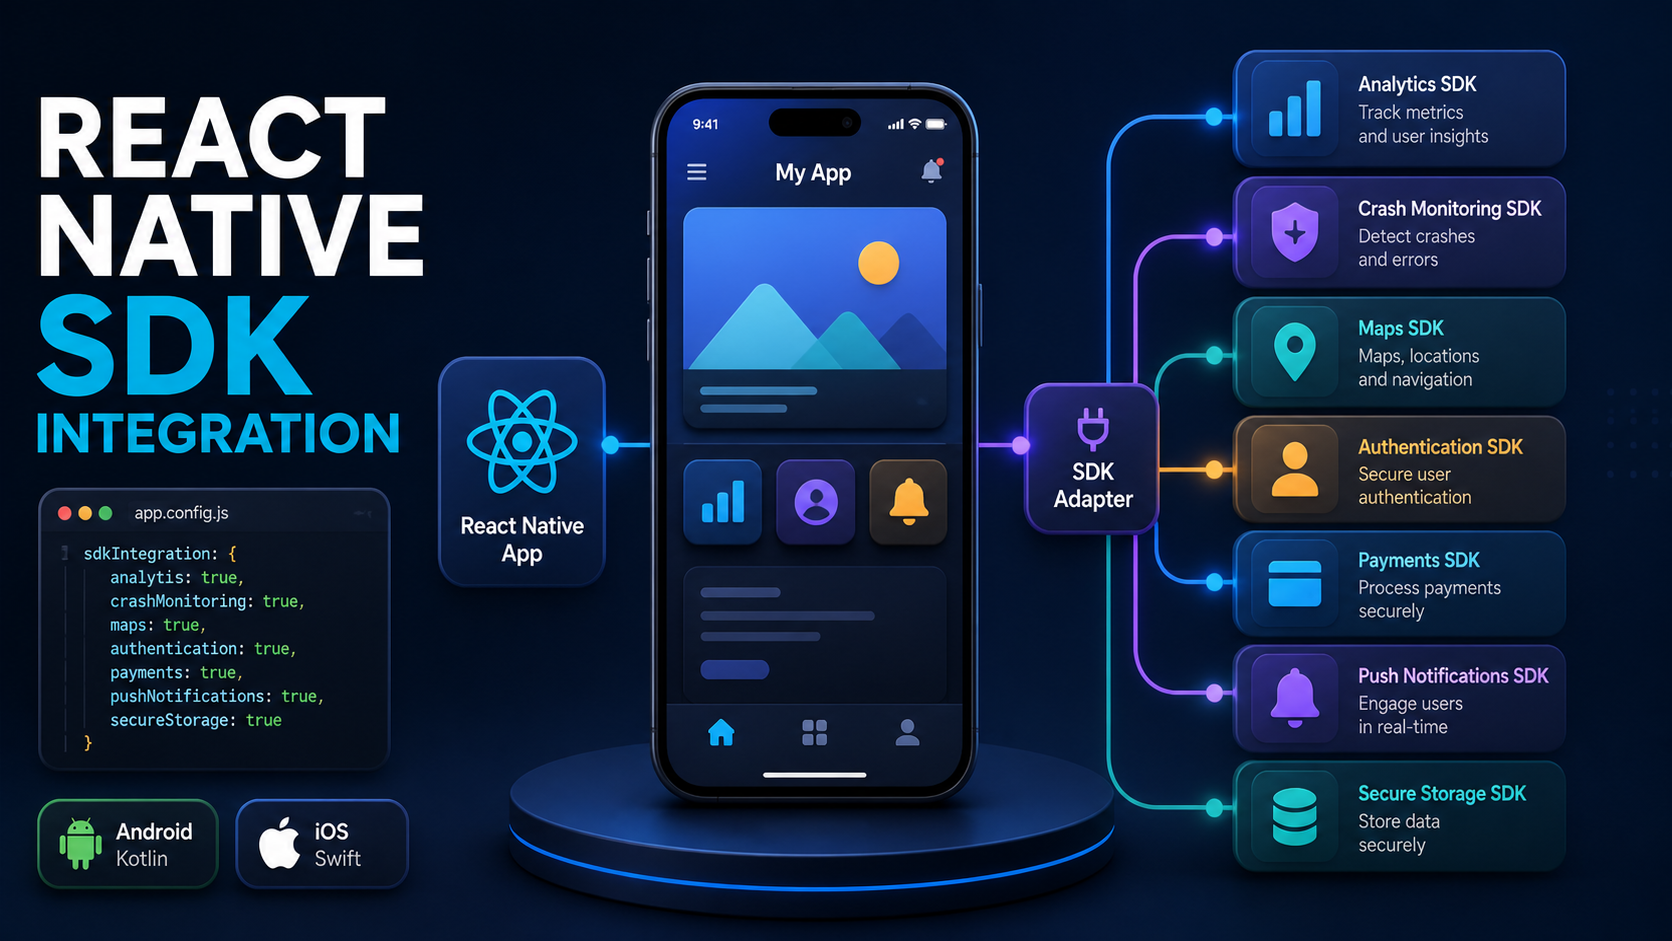

Trong một ứng dụng React Native thực tế, SDK xuất hiện ở hầu hết các lớp quan trọng: analytics để đo hành vi, Crashlytics hoặc Sentry để theo dõi lỗi, bản đồ, đăng nhập, thanh toán, push notification, deep link, lưu trữ an toàn và nhiều dịch vụ khác. Cài package chỉ là bước đầu; phần khó nằm ở việc kết nối đúng giữa JavaScript, Android, iOS và backend.
Bài viết này trình bày một quy trình có thể áp dụng cho hầu hết SDK trong dự án React Native CLI. Nội dung tập trung vào những điểm thường gây lỗi: chọn package, kiểm tra tương thích, cấu hình native, permission, API key, khởi tạo SDK, tách lớp adapter, kiểm thử và chuẩn bị bản release.
Phạm vi bài viết: React Native CLI/bare workflow. Với Expo Managed, nhiều bước native được thay bằng config plugin và quá trình EAS Build; hãy xem tài liệu riêng của SDK trước khi áp dụng nguyên xi các đoạn cấu hình Android/iOS trong bài.
Nội dung chính
- SDK là gì và vì sao tích hợp thường khó?
- Phân loại SDK trong React Native
- Quy trình 10 bước tích hợp một SDK
- Kiểm tra tương thích trước khi cài
- Cài package và rebuild native
- Cấu hình Android
- Cấu hình iOS
- Quản lý config và secret
- Thiết kế lớp adapter cho SDK
- Ví dụ Analytics, Crashlytics, Maps, Payment và Auth
- Permission và lifecycle
- Test, debug và release
- Checklist hoàn tất
1. SDK là gì và vì sao tích hợp thường khó?
SDK, viết tắt của Software Development Kit, là bộ thư viện, API, công cụ và tài liệu do một nhà cung cấp phát hành để ứng dụng sử dụng một dịch vụ. Một SDK mobile thường gồm hai phần:
- Lớp JavaScript/React Native: component, hook hoặc hàm để code React Native gọi.
- Lớp native: thư viện Kotlin/Java trên Android, Swift/Objective-C trên iOS, nơi SDK thực sự giao tiếp với hệ điều hành hoặc dịch vụ.
Vì vậy, lỗi có thể xuất hiện ở nhiều tầng:
- Package JavaScript không tương thích với phiên bản React Native.
- CocoaPods hoặc Gradle không resolve được dependency native.
- App ID, bundle ID, signing hoặc capability không khớp.
- Permission chưa được khai báo hoặc chưa xin runtime.
- API key sai restriction, sai môi trường hoặc SDK chưa được bật trong console.
- SDK được gọi trước khi native initialization hoàn tất.
- Backend dùng sai secret hoặc gửi payload không đúng contract.
Tư duy quan trọng là xem SDK như một integration boundary, không phải một file npm được cài thêm. Mỗi SDK cần có owner, config, lifecycle, logging, test và kế hoạch gỡ bỏ.
2. Phân loại SDK trong React Native
| Loại SDK | Ví dụ | Điểm cần chú ý |
|---|---|---|
| JavaScript thuần | SDK gọi REST/WebSocket bằng JS | Ít cấu hình native, nhưng phải quản lý secret và network. |
| Native-backed wrapper | Firebase, Maps, camera, biometric | Cần Gradle, CocoaPods, AppDelegate, permission hoặc capability. |
| UI native component | MapView, payment sheet, social login button | Cần kiểm tra layout, lifecycle và New Architecture. |
| Service backend | Payment, messaging, subscription | Client chỉ giữ public key; nghiệp vụ tin cậy nằm ở server. |
| SDK nội bộ | Design system, logging, feature flag | Cần versioning, tài liệu và contract ổn định giữa các app. |
Ví dụ, Google Maps có native SDK riêng cho Android/iOS, còn react-native-maps cung cấp lớp React Native. Stripe cũng sử dụng native iOS và Android SDK bên dưới lớp React Native. Do đó, kiểm tra package README và changelog là việc bắt buộc trước khi copy cấu hình.
3. Quy trình 10 bước tích hợp một SDK
- Xác định use case: SDK giải quyết một yêu cầu cụ thể nào? Có thể dùng REST API hoặc module hiện có thay thế không?
- Đánh giá nhà cung cấp: hoạt động lâu dài, tài liệu, support, giấy phép, chính sách dữ liệu và chi phí.
- Kiểm tra tương thích: React Native, Hermes, New Architecture/Fabric, Android API, iOS deployment target và package manager.
- Thiết kế secret boundary: điều gì được phép nằm trong app và điều gì chỉ được nằm ở backend?
- Cài dependency: thêm package và lockfile, không cài nhiều SDK thay thế cho cùng một chức năng.
- Cấu hình native: Android manifest/Gradle và iOS Podfile/Info.plist/capability.
- Tạo adapter: UI và nghiệp vụ gọi interface nội bộ, không phụ thuộc trực tiếp vào API vendor ở mọi file.
- Xử lý lifecycle: khởi tạo một lần, subscribe/unsubscribe listener, cleanup khi unmount.
- Viết test và smoke test: mock adapter ở unit test, test thật trên device ở staging.
- Ghi tài liệu vận hành: key ở đâu, cách rotate, cách debug, ai sở hữu và khi nào cần cập nhật version.
4. Kiểm tra tương thích trước khi cài
Trước khi chạy lệnh cài, hãy ghi lại các phiên bản chính:
npx react-native info
node --version
yarn --version
cd android && ./gradlew --version
cd ../ios && pod --version
Đọc các mục sau trong tài liệu SDK:
- Phiên bản React Native tối thiểu và tối đa.
- New Architecture có bắt buộc hay chưa.
- Hermes có được hỗ trợ không.
- Android
minSdk,compileSdk, Kotlin và Gradle yêu cầu gì. - iOS deployment target, Swift version và CocoaPods yêu cầu gì.
- Có xung đột với
use_frameworks!, static/dynamic framework hoặc Google Play Services không. - SDK có phụ thuộc vào permission, app extension, notification service extension hay capability đặc biệt không.
Đừng chỉ kiểm tra phiên bản mới nhất. Phiên bản mới có thể yêu cầu New Architecture hoặc thay đổi API. Hãy xem migration guide và chọn version phù hợp với codebase. React Native Firebase hiện ghi rõ yêu cầu New Architecture từ major version mới; react-native-maps cũng công bố bảng tương thích riêng cho Fabric.
5. Cài package và rebuild native
Ví dụ cài một nhóm SDK thường gặp:
yarn add @react-native-firebase/app

yarn add @react-native-firebase/analytics \
  @react-native-firebase/crashlytics \
  @react-native-firebase/messaging

yarn add react-native-maps
yarn add @stripe/stripe-react-native
yarn add @sentry/react-native

cd ios
pod install --repo-update
cd ..
Chỉ cài những module thực sự dùng. Mỗi package native làm tăng kích thước binary, thời gian build, số dependency và bề mặt cần bảo trì.
Sau khi cài SDK native, phải rebuild app:
yarn android
# hoặc
yarn ios
Reload Metro chỉ tải lại JavaScript bundle; nó không biên dịch module Kotlin/Swift mới. Nếu gặp lỗi stale build, có thể dọn đúng phạm vi:
cd android && ./gradlew clean && cd ..
cd ios && pod install && cd ..
6. Cấu hình Android
6.1. Manifest và permission
Mỗi SDK có yêu cầu manifest riêng. Ví dụ notification Android 13+ cần permission runtime; bản đồ cần API key meta-data; deep link cần intent-filter; biometric hoặc camera cần permission tương ứng.
<manifest xmlns:android="http://schemas.android.com/apk/res/android">
  <uses-permission android:name="android.permission.INTERNET" />
  <uses-permission android:name="android.permission.POST_NOTIFICATIONS" />

  <application
    android:name=".MainApplication"
    android:label="@string/app_name">
    <meta-data
      android:name="com.google.android.geo.API_KEY"
      android:value="MAPS_API_KEY" />
  </application>
</manifest>
Đừng dán secret key trực tiếp vào manifest hoặc commit vào git. Với API key bắt buộc nằm trong app như Maps key, hãy dùng restriction theo package name và SHA-1 signing certificate, đồng thời giới hạn các API được phép gọi.
6.2. Gradle và dependency conflict
Android project có thể gặp lỗi do hai SDK yêu cầu hai version khác nhau của Kotlin, AndroidX hoặc Google Play Services. Khi đó:
- Đọc dependency tree để biết thư viện nào kéo version nào.
- Ưu tiên nâng package gây conflict lên version tương thích.
- Chỉ pin version ở cấp project khi đã xác nhận tất cả SDK chạy ổn.
- Không thêm hàng loạt
resolutionStrategy.forceđể che lỗi; cách này có thể tạo crash runtime.
cd android
./gradlew app:dependencies
./gradlew app:dependencyInsight \
  --dependency play-services-maps \
  --configuration debugRuntimeClasspath
6.3. Build variant
Nên tách debug, staging và release nếu app có nhiều môi trường. Mỗi variant có thể dùng Firebase project, API endpoint và API key khác nhau.
android {
  buildTypes {
    debug {
      applicationIdSuffix '.debug'
      buildConfigField 'String', 'API_BASE_URL',
        '"https://api-dev.example.com"'
    }
    release {
      buildConfigField 'String', 'API_BASE_URL',
        '"https://api.example.com"'
    }
  }
}
Không dùng applicationIdSuffix mà quên đăng ký package debug trên Firebase hoặc console của SDK. Kết quả thường là debug chạy, nhưng staging/release không khởi tạo được.
7. Cấu hình iOS
7.1. CocoaPods
SDK native iOS thường được liên kết qua CocoaPods. Sau khi thêm package, chạy:
cd ios
pod install --repo-update
open YourApp.xcworkspace
Luôn mở .xcworkspace khi project dùng Pods, không mở .xcodeproj. Nếu Podfile có use_frameworks!, hãy kiểm tra SDK có hỗ trợ static/dynamic frameworks hay không.
7.2. AppDelegate và native initialization
Một số SDK cần khởi tạo rất sớm trong AppDelegate.swift:
import Firebase

@main
class AppDelegate: RCTAppDelegate {
  override func application(
    _ application: UIApplication,
    didFinishLaunchingWithOptions launchOptions: [UIApplication.LaunchOptionsKey: Any]? = nil
  ) -> Bool {
    FirebaseApp.configure()
    return super.application(
      application,
      didFinishLaunchingWithOptions: launchOptions
    )
  }
}
Với SDK khác, lệnh khởi tạo có thể là SDK.initialize(), MapsServices.provideAPIKey() hoặc thiết lập delegate native. Đọc đúng vị trí mà vendor yêu cầu; thứ tự khởi tạo có thể ảnh hưởng tới việc đọc config, deep link, push và crash reporting.
7.3. Info.plist, capabilities và entitlements
Permission message trong Info.plist phải giải thích đúng mục đích người dùng. Ví dụ:
<key>NSCameraUsageDescription</key>
<string>Ứng dụng cần camera để quét mã sản phẩm.</string>

<key>NSLocationWhenInUseUsageDescription</key>
<string>Ứng dụng cần vị trí để hiển thị địa điểm gần bạn.</string>
Trong Xcode, một số tính năng yêu cầu bật capability tương ứng:
- Push Notifications.
- Background Modes.
- Associated Domains cho universal links.
- Sign in with Apple cho Apple authentication.
- Keychain Sharing hoặc App Groups cho một số SDK và extension.
Capability, bundle ID và provisioning profile phải đồng bộ. Lỗi “entitlement not found” hoặc “missing application-identifier” thường nằm ở signing chứ không phải JavaScript.
8. Quản lý config, public key và secret
Không phải key nào xuất hiện trong mobile app cũng là secret. API key public vẫn cần restriction, nhưng không thể bảo mật tuyệt đối vì app có thể bị reverse-engineer.
| Thông tin | Có thể nằm trong app? | Cách bảo vệ |
|---|---|---|
| Firebase app config | Thường có | Giới hạn package/bundle ID, App Check khi phù hợp. |
| Google Maps API key | Có, nếu SDK yêu cầu | Restriction theo app, certificate và API. |
| Stripe publishable key | Có | Chỉ dùng public/publishable key; payment intent tạo ở server. |
| OAuth client ID | Thường có | Redirect URI và bundle/package restriction. |
| Service account JSON | Không | Chỉ lưu ở backend, CI secret hoặc secret manager. |
| Stripe secret key | Không | Chỉ ở backend; rotate nếu lộ. |
| Encryption master key | Không | Không nhúng vào app; dùng backend/KMS. |
Có thể dùng .env cho cấu hình build, nhưng .env được bundle vào app không phải kho bí mật. Không commit file chứa secret:
.env
.env.*
!.env.example
*.p8
service-account*.json
File .env.example chỉ chứa tên biến:
API_BASE_URL=https://api-dev.example.com
MAPS_API_KEY=replace-me
FIREBASE_PROJECT_ID=replace-me
STRIPE_PUBLISHABLE_KEY=pk_test_replace-me
9. Thiết kế lớp adapter cho SDK
Nếu component nào cũng import trực tiếp SDK vendor, việc thay SDK hoặc viết test sẽ rất khó. Tạo interface nội bộ trước:
export type AnalyticsEvent =
  | {name: 'screen_view'; screen: string}
  | {name: 'add_to_cart'; productId: string; value: number}
  | {name: 'purchase'; orderId: string; value: number};

export interface AnalyticsClient {
  track(event: AnalyticsEvent): Promise<void>;
  setUserId(userId: string | null): Promise<void>;
  setUserProperty(name: string, value: string): Promise<void>;
}
Adapter cho vendor cụ thể:
import analytics from '@react-native-firebase/analytics';
import type {AnalyticsClient, AnalyticsEvent} from './types';

export const firebaseAnalytics: AnalyticsClient = {
  async track(event: AnalyticsEvent) {
    switch (event.name) {
      case 'screen_view':
        await analytics().logScreenView({
          screen_name: event.screen,
          screen_class: event.screen,
        });
        return;
      case 'add_to_cart':
        await analytics().logAddToCart({
          item_id: event.productId,
          value: event.value,
          currency: 'VND',
        });
        return;
      case 'purchase':
        await analytics().logPurchase({
          transaction_id: event.orderId,
          value: event.value,
          currency: 'VND',
        });
        return;
    }
  },

  async setUserId(userId) {
    await analytics().setUserId(userId);
  },

  async setUserProperty(name, value) {
    await analytics().setUserProperty(name, value);
  },
};
Component chỉ dùng interface:
import {firebaseAnalytics} from '@/integrations/analytics/firebaseAnalytics';

await firebaseAnalytics.track({
  name: 'add_to_cart',
  productId: product.id,
  value: product.price,
});
Tốt hơn nữa, inject client qua module hoặc context để test có thể thay bằng fake implementation:
export const fakeAnalytics: AnalyticsClient = {
  track: async event => console.log('TEST EVENT', event),
  setUserId: async () => {},
  setUserProperty: async () => {},
};
Lợi ích của adapter:
- UI không biết package vendor nào đang dùng.
- Tên event và schema được kiểm soát tập trung.
- Thay Firebase bằng một analytics provider khác ít ảnh hưởng hơn.
- Unit test không cần khởi tạo native SDK.
- Log, retry và privacy rule nằm ở một nơi.
10. Các ví dụ SDK thường gặp
10.1. Firebase Analytics và Crashlytics
Với Firebase, cài @react-native-firebase/app trước, sau đó cài module cần dùng. Firebase Analytics nên được gọi từ một adapter có chuẩn event thống nhất:
import analytics from '@react-native-firebase/analytics';

export async function trackScreen(screenName: string) {
  await analytics().logScreenView({
    screen_name: screenName,
    screen_class: screenName,
  });
}

export async function trackLogin(method: 'email' | 'google' | 'apple') {
  await analytics().logLogin({login_type: method});
}
Crash reporting không nên ghi access token, mật khẩu, số thẻ hoặc nội dung tin nhắn. Chỉ ghi user ID đã được mã hóa/ẩn danh, screen, app version và một vài breadcrumb cần thiết.
import crashlytics from '@react-native-firebase/crashlytics';

export function reportCheckoutError(error: unknown, orderId: string) {
  crashlytics().setAttribute('flow', 'checkout');
  crashlytics().setAttribute('order_id_hash', hashForLog(orderId));
  crashlytics().recordError(
    error instanceof Error ? error : new Error('Checkout failed'),
  );
}
10.2. FCM Push Notification
FCM cần cấu hình riêng cho Android, iOS/APNs, permission, token và ba trạng thái foreground/background/quit. Không nhồi toàn bộ logic vào App.tsx; nên tạo notificationService và lưu token trên backend.
import {
  getMessaging,
  getToken,
  onTokenRefresh,
} from '@react-native-firebase/messaging';

const messaging = getMessaging();

export async function registerPushToken() {
  const token = await getToken(messaging);
  await api.post('/devices', {
    token,
    platform: Platform.OS,
  });
}

export function observeTokenRefresh() {
  return onTokenRefresh(messaging, token => {
    return api.post('/devices', {
      token,
      platform: Platform.OS,
    });
  });
}
Đọc bài Hướng dẫn tích hợp FCM vào React Native từ A-Z để xem đầy đủ phần APNs, background handler, data-only message, Notifee và Firebase Admin SDK.
10.3. Google Maps với react-native-maps
Cài thư viện:
yarn add react-native-maps
cd ios && pod install && cd ..
Android dùng Google Maps và cần API key trong manifest:
<application>
  <meta-data
    android:name="com.google.android.geo.API_KEY"
    android:value="MAPS_API_KEY" />
</application>
iOS có thể dùng Apple Maps mặc định hoặc Google Maps. Nếu dùng Google Maps, cần pod Google và gọi provideAPIKey trong AppDelegate theo tài liệu package. Google Maps iOS yêu cầu deployment target phù hợp; luôn kiểm tra version hiện tại trước khi sửa Podfile.
import MapView, {Marker, PROVIDER_GOOGLE} from 'react-native-maps';

export function StoreMap() {
  return (
    <MapView
      provider={PROVIDER_GOOGLE}
      style={{height: 320, width: '100%'}}
      initialRegion={{
        latitude: 10.7769,
        longitude: 106.7009,
        latitudeDelta: 0.05,
        longitudeDelta: 0.05,
      }}
    >
      <Marker
        coordinate={{latitude: 10.7769, longitude: 106.7009}}
        title="AE Dev"
      />
    </MapView>
  );
}
Nếu map trắng hoặc xám, kiểm tra API key restriction, API đã enable, Google Play Services và kích thước container. Một MapView không có chiều cao cũng có thể khiến bạn tưởng SDK không hoạt động.
10.4. Stripe Payment Sheet
Thanh toán là ví dụ rõ nhất cho ranh giới client/server:
- Client gọi backend để tạo PaymentIntent hoặc giá trị thanh toán.
- Backend dùng Stripe secret key và trả về client secret.
- Client khởi tạo Payment Sheet bằng publishable key/client secret.
- Backend nhận webhook để xác nhận trạng thái thật, không tin tuyệt đối vào callback của client.
import {StripeProvider, useStripe} from '@stripe/stripe-react-native';

function CheckoutButton() {
  const {initPaymentSheet, presentPaymentSheet} = useStripe();

  async function checkout() {
    const {data} = await api.post('/payments/create-intent', {
      orderId: 'order-123',
    });

    const initResult = await initPaymentSheet({
      merchantDisplayName: 'AE Dev Store',
      paymentIntentClientSecret: data.clientSecret,
    });

    if (initResult.error) throw initResult.error;

    const result = await presentPaymentSheet();
    if (result.error) {
      throw new Error(result.error.message);
    }
  }

  return <Button title="Thanh toán" onPress={checkout} />;
}

export function App() {
  return (
    <StripeProvider publishableKey={Config.STRIPE_PUBLISHABLE_KEY}>
      <CheckoutButton />
    </StripeProvider>
  );
}
Không đưa Stripe secret key, webhook signing secret hoặc service account vào React Native. Tài liệu Stripe cũng nhấn mạnh dùng official libraries ở server để gọi Stripe API.
10.5. Authentication SDK
Social login thường cần nhiều phần: client ID, redirect URI, URL scheme, Android SHA certificate, iOS capability và xử lý callback. Nên tạo một auth adapter:
export type AuthResult = {
  provider: 'google' | 'apple';
  idToken: string;
};

export interface SocialAuthClient {
  signIn(): Promise<AuthResult>;
  signOut(): Promise<void>;
}

export async function signInAndExchange(
  client: SocialAuthClient,
) {
  const result = await client.signIn();
  return api.post('/auth/mobile/exchange', {
    provider: result.provider,
    idToken: result.idToken,
  });
}
Backend phải verify token với nhà cung cấp, kiểm tra audience, issuer, nonce và thời hạn. Không coi việc client nhận được id token là bằng chứng cuối cùng cho user identity.
11. Permission và lifecycle
11.1. Xin permission theo ngữ cảnh
Chỉ xin permission khi người dùng bắt đầu tính năng liên quan. Trước native dialog, hiển thị giải thích ngắn và nói rõ lợi ích. Nếu status là blocked, đưa người dùng tới Settings thay vì gọi request lặp lại.
import {
  check,
  openSettings,
  request,
  RESULTS,
  PERMISSIONS,
} from 'react-native-permissions';

export async function requestCameraAccess() {
  const permission = Platform.select({
    ios: PERMISSIONS.IOS.CAMERA,
    android: PERMISSIONS.ANDROID.CAMERA,
  });

  if (!permission) return false;

  const current = await check(permission);
  if (current === RESULTS.GRANTED) return true;
  if (current === RESULTS.BLOCKED) {
    await openSettings('application');
    return false;
  }

  const next = await request(permission);
  return next === RESULTS.GRANTED;
}
11.2. Khởi tạo một lần
SDK singleton nên được khởi tạo ở module service hoặc bootstrap layer, không khởi tạo lại mỗi lần component render.
let initialized = false;

export async function initializeSdk() {
  if (initialized) return;

  await vendorSdk.initialize({
    apiKey: Config.PUBLIC_API_KEY,
  });

  initialized = true;
}
11.3. Cleanup listener
useEffect(() => {
  const unsubscribe = sdk.onEvent(event => {
    setState(event);
  });

  return () => unsubscribe();
}, []);
Không cleanup listener có thể gây callback trùng, memory leak hoặc event cập nhật state sau khi màn hình đã unmount. Với SDK chạy background, hãy xem giới hạn execution của từng nền tảng và luôn trả về Promise từ background handler.
12. Chuẩn hóa lỗi và logging
SDK vendor thường có error code khác nhau. Đừng để error của SDK lan thẳng lên UI; map thành error nội bộ:
export type AppError =
  | {kind: 'permission_denied'; feature: string}
  | {kind: 'network'; retryable: boolean}
  | {kind: 'configuration'; feature: string}
  | {kind: 'provider'; code?: string};

export function mapSdkError(error: unknown): AppError {
  const code = getVendorCode(error);

  if (code === 'permission-denied') {
    return {kind: 'permission_denied', feature: 'camera'};
  }

  if (code === 'network-error') {
    return {kind: 'network', retryable: true};
  }

  return {kind: 'provider', code};
}
Log nên có:
- Tên SDK và version.
- Environment và app version.
- Operation đang chạy.
- Error code đã chuẩn hóa.
- Request ID hoặc correlation ID không chứa secret.
Không log API key, client secret, access token, device token hoặc thông tin cá nhân nhạy cảm. Build production nên giảm log verbose và gửi lỗi quan trọng tới crash reporting.
13. Test, debug và release
13.1. Unit test bằng fake adapter
it('tracks add to cart', async () => {
  const track = jest.fn().mockResolvedValue(undefined);
  const analytics = {
    track,
    setUserId: jest.fn(),
    setUserProperty: jest.fn(),
  };

  await addProductToCart(analytics, {
    id: 'p-1',
    price: 120000,
  });

  expect(track).toHaveBeenCalledWith({
    name: 'add_to_cart',
    productId: 'p-1',
    value: 120000,
  });
});
13.2. Native smoke test
Unit test không thay thế được test native. Mỗi SDK cần một smoke test trên thiết bị thật:
- App khởi động bình thường sau clean install.
- Permission dialog xuất hiện đúng thời điểm.
- SDK hoạt động khi app foreground và background nếu có liên quan.
- Logout, đổi tài khoản và cài lại app không làm lộ dữ liệu tài khoản cũ.
- Debug, staging và release dùng đúng config.
- Thiết bị Android không có Google Play Services được xử lý rõ nếu SDK phụ thuộc.
- iOS simulator và thiết bị thật được phân biệt khi SDK yêu cầu camera, APNs, Bluetooth hoặc biometrics.
13.3. Debug build failure
# Android
cd android
./gradlew app:assembleDebug --stacktrace
./gradlew app:dependencies

# iOS
cd ios
pod deintegrate
pod install --repo-update
xcodebuild -workspace YourApp.xcworkspace \
  -scheme YourApp \
  -configuration Debug
Không xóa toàn bộ cache ngay khi gặp lỗi. Hãy đọc dòng lỗi đầu tiên liên quan tới SDK, xác định đó là lỗi resolve dependency, compile native, signing hay runtime rồi mới dọn đúng phần.
13.4. Checklist bảo mật trước release
- Không có secret key hoặc service account trong bundle.
- API key public đã restriction theo app và environment.
- Không gửi dữ liệu nhạy cảm vào analytics/crash logs.
- Webhook payment được verify ở backend.
- OAuth redirect URI chỉ cho phép domain/scheme hợp lệ.
- Permission message mô tả đúng chức năng.
- Privacy policy cập nhật theo dữ liệu SDK thu thập.
- Đã test app khi offline, token hết hạn và SDK trả lỗi.
- Đã có kế hoạch rotate key và nâng version.
14. Những cách tích hợp dễ gây nợ kỹ thuật
14.1. Gọi SDK trực tiếp trong mọi component
Điều này tạo coupling cao, khó mock và khó đổi provider. Hãy gom vào adapter theo capability như analytics, push, maps hoặc payments.
14.2. Copy toàn bộ hướng dẫn cũ từ blog
Native SDK thường thay đổi Gradle plugin, CocoaPods, permission và API. Ưu tiên tài liệu chính thức, release notes và migration guide của package đang cài.
14.3. Chỉ test trên debug
Release có thể dùng signing certificate, bundle ID, API key, Firebase project hoặc optimization khác. Hãy tạo staging build gần production nhất và chạy smoke test trước khi phát hành.
14.4. Nhúng secret vào app
Mobile binary có thể bị phân tích. Secret dùng để tạo payment, gửi FCM hoặc truy cập database phải ở backend. App chỉ gọi API của backend và nhận dữ liệu tối thiểu cần thiết.
14.5. Dùng quá nhiều SDK trùng chức năng
Ví dụ cài đồng thời nhiều analytics SDK, nhiều push provider hoặc nhiều payment wrapper mà không có lý do rõ ràng. Điều này làm tăng binary size, event trùng, dependency conflict và chi phí vận hành.
15. Checklist tích hợp SDK hoàn chỉnh
| Nhóm | Câu hỏi kiểm tra |
|---|---|
| Mục tiêu | SDK giải quyết use case nào? Có cần thiết không? |
| Tương thích | React Native, Hermes, New Architecture, Android/iOS target có phù hợp không? |
| Cài đặt | Package, lockfile, Pods và Gradle đã được commit đúng chưa? |
| Android | Manifest, permission, API key, Gradle, variant và Play Services đã đúng chưa? |
| iOS | Podfile, Info.plist, capabilities, entitlement, signing và AppDelegate đã đúng chưa? |
| Security | Secret có nằm ngoài mobile app không? Public key đã restriction chưa? |
| Code | SDK có adapter/interface, error mapping và logging chuẩn hóa chưa? |
| Lifecycle | Initialization có chạy một lần? Listener/timer có cleanup không? |
| Testing | Unit test fake adapter và smoke test trên device đã có chưa? |
| Release | Staging/release config, privacy policy và kế hoạch rotate key đã sẵn sàng chưa? |
Kết luận
Tích hợp SDK trong React Native là bài toán hệ thống chứ không phải chỉ là chạy yarn add. Cách làm bền vững gồm bốn nguyên tắc: kiểm tra tương thích trước, tách config và secret đúng ranh giới, cô lập vendor bằng adapter, rồi kiểm thử native theo từng environment.
Với app nhỏ, một service module gọn có thể đủ. Khi app lớn dần, nên có cấu trúc rõ như src/integrations, mỗi SDK có interface, implementation, config, error mapping và test riêng. Nhờ vậy, team có thể nâng version hoặc thay nhà cung cấp mà không phải sửa toàn bộ màn hình trong ứng dụng.




d
hi